Network Services

Hotspot Mikrotik 777

Technology has been used Bootstrap Compatible Mobile.

Design Hotspot-12 beautiful Server Mikrotik

Design Hot Spot Mikrotik Free

Hotspot login server free

Hotspot login server free.

Merge 2 lines in server Pfsense?

Merge 2 lines in server Pfsense server free.

setup squid cahce in Ubuntu

How to setup squid cahce in Ubuntu ?

Sunday, August 26, 2012

Exim4 for ubuntu


Quoting one of e-books


Exim4

2. Exim4


Exim4 is another Message Transfer Agent (MTA) developed at the University of Cambridge for use 
on Unix systems connected to the Internet. Exim can be installed in place of sendmail, although the 
configuration of exim is quite different to that of sendmail.


2.1. Installation:

To install exim4, run the following command:

sudo apt-get install exim4

2.2. Configuration:

To configure Exim4, run the following command:

sudo dpkg-reconfigure exim4-config


The user interface will be displayed. The user interface lets you configure many parameters. For example, In Exim4 the configuration files are split among multiple files. If you wish to have them in one file you can configure accordingly in this user interface.


All the parameters you configure in the user interface are stored in /etc/exim4/update-exim4.conf file. If you wish to re-configure, either you re-run the configuration wizard or manually edit this file using your favorite editor. Once you configure, you can run the following command to generate the master configuration file:
sudo update-exim4.conf


The master configuration file, is generated and it is stored in /var/lib/exim4/config.autogenerated.

Stpo:
At any time, you should not edit the master configuration file, /var/lib/exim4/
config.autogenerated manually. It is updated automatically every time you run update-exim4.conf

You can run the following command to start Exim4 daemon.

sudo /etc/init.d/exim4 start


2.3. SMTP Authentication:

This section covers configuring Exim4 to use SMTP-AUTH with TLS and SASL.


The first step is to create a certificate for use with TLS. Enter the following into a terminal prompt:

sudo /usr/share/doc/exim4-base/examples/exim-gencert


Now Exim4 needs to be configured for TLS by editing /etc/exim4/conf.d/main/03_exim4- config_tlsoptions add the following:


MAIN_TLS_ENABLE = yes


Next you need to configure Exim4 to use the saslauthd for authentication. Edit /etc/exim4/conf.d/auth/30_exim4-config_examples and uncomment the plain_saslauthd_server and
login_saslauthd_server sections:


plain_saslauthd_server:
    driver = plaintext
   public_name = PLAIN
   server_condition = ${if saslauthd{{$auth2}{$auth3}}{1}{0}}
   server_set_id = $auth2
   server_prompts = :
   .ifndef AUTH_SERVER_ALLOW_NOTLS_PASSWORDS
   server_advertise_condition = ${if eq{$tls_cipher}{}{}{*}}
   .endif
#
  login_saslauthd_server:
   driver = plaintext
   public_name = LOGIN
   server_prompts = "Username:: : Password::"
   # don't send system passwords over unencrypted connections
   server_condition = ${if saslauthd{{$auth1}{$auth2}}{1}{0}}
   server_set_id = $auth1
   .ifndef AUTH_SERVER_ALLOW_NOTLS_PASSWORDS
   server_advertise_condition = ${if eq{$tls_cipher}{}{}{*}}
   .endif


Additionally, in order for outside mail client to be able to connect to new exim server, new user needs
to be added into exim by using the following commands.


sudo /usr/share/doc/exim4/examples/exim-adduser

Users should protect the new exim password files with the following commands.


sudo chown root:Debian-exim /etc/exim4/passwd
sudo chmod 640 /etc/exim4/passwd


Finally, update the Exim4 configuration and restart the service:


sudo update-exim4.conf
sudo /etc/init.d/exim4 restart

2.4. Configuring SASL:


This section provides details on configuring the saslauthd to provide authentication for Exim4.

The first step is to install the sasl2-bin package. From a terminal prompt enter the following:

sudo apt-get install sasl2-bin

To configure saslauthd edit the /etc/default/saslauthd configuration file and set START=no to:

START=yes

Next the Debian-exim user needs to be part of the sasl group in order for Exim4 to use the saslauthd service:

sudo adduser Debian-exim sasl

Now start the saslauthd service:

sudo /etc/init.d/saslauthd start


Exim4 is now configured with SMTP-AUTH using TLS and SASL authentication.

2.5. References:


• See exim.org9 for more information.
• There is also an Exim4 Book10 available.
• Another resource is the Exim4 Ubuntu Wiki 11 page.


See you in the next lesson
Mr.Mohamed samir™


Saturday, August 25, 2012

Email Services for Ubuntu


Quoting one of e-books


Email Services for Ubuntu

The process of getting an email from one person to another over a network or the Internet involves many systems working together. Each of these systems must be correctly configured for the process to
work. The sender uses a Mail User Agent (MUA), or email client, to send the message through one or more Mail Transfer Agents (MTA), the last of which will hand it off to a Mail Delivery Agent (MDA)
for delivery to the recipient's mailbox, from which it will be retrieved by the recipient's email client, usually via a POP3 or IMAP server.


1. Postfix
2. Exim4
3. Dovecot Server
4. Mailman
5. Mail Filtering


Postfix for Ubuntu


Quoting one of e-books


 Postfix 

Postfix is the default Mail Transfer Agent (MTA) in Ubuntu. It attempts to be fast and easy to administer and secure. It is compatible with the MTA sendmail. This section explains how to install and configure postfix. It also explains how to set it up as an SMTP server using a secure connection
(for sending emails securely).

Note:
This guide does not cover setting up Postfix Virtual Domains, for information on Virtual
Domains and other advanced configurations see Section 1.7.3, “References”.

1.1. Installation:
To install postfix run the following command:

sudo apt-get install postfix

Simply press return when the installation process asks questions, the configuration will be done in
greater detail in the next stage.

1.2. Basic Configuration:

To configure postfix, run the following command:

sudo dpkg-reconfigure postfix

The user interface will be displayed. On each screen, select the following values:


• Internet Site
• mail.example.com
• steve
• mail.example.com, localhost.localdomain, localhost
• No
• 127.0.0.0/8 [::ffff:127.0.0.0]/104 [::1]/128 192.168.0.0/24
• 0
• +
• all

Note:

Replace mail.example.com with the domain for which you'll accept email, 192.168.0.0/24 with the actual network and class range of your mail server, and steve with the appropriate username.

Now is a good time to decide which mailbox format you want to se. By default Postfix will use mbox for the mailbox format. Rather than editing the configuration file directly, you can use the postconf command to configure all postfix parameters. The configuration parameters will be stored in


/etc/postfix/main.cf file. Later if you wish to re-configure a particular parameter, you can either
run the command or change it manually in the file.

To configure the mailbox format for Maildir:

sudo postconf -e 'home_mailbox = Maildir/'

Note:

This will place new mail in /home/username/Maildir so you will need to configure your Mail Delivery Agent (MDA) to use the same path.

1.3. SMTP Authentication:

SMTP-AUTH allows a client to identify itself through an authentication mechanism (SASL).
Transport Layer Security (TLS) should be used to encrypt the authentication process. Once
authenticated the SMTP server will allow the client to relay mail.

1. Configure Postfix for SMTP-AUTH using SASL (Dovecot SASL):


sudo postconf -e 'smtpd_sasl_type = dovecot'
sudo postconf -e 'smtpd_sasl_path = private/auth-client'
sudo postconf -e 'smtpd_sasl_local_domain ='
sudo postconf -e 'smtpd_sasl_security_options = noanonymous'
sudo postconf -e 'broken_sasl_auth_clients = yes'
sudo postconf -e 'smtpd_sasl_auth_enable = yes'
sudo postconf -e 'smtpd_recipient_restrictions = \
permit_sasl_authenticated,permit_mynetworks,reject_unauth_destination'

Note:
The smtpd_sasl_path configuration is a path relative to the Postfix queue directory.


2. Next, generate or obtain a digital certificate for TLS. See Section 5, “Certificates” for details. This example also uses a Certificate Authority (CA). For information on generating a CA certificate see Section 5.5, “Certification Authority”.


Note:

MUAs connecting to your mail server via TLS will need to recognize the certificate used for TLS. This can either be done using a certificate from a commercial CA or with a self-signed certificate that users manually install/accept. For MTA to MTA
TLS certficates are never validated without advance agreement from the affected organizations. For MTA to MTA TLS, unless local policy requires it, there is no reason not to use a self-signed certificate. Refer to Section 5.3, “Creating a Self-Signed
Certificate”  for more details.


3. Once you have a certificate, configure Postfix to provide TLS encryption for both incoming and outgoing mail:


sudo postconf -e 'smtp_tls_security_level = may'
sudo postconf -e 'smtpd_tls_security_level = may'


sudo postconf -e 'smtp_tls_note_starttls_offer = yes'
sudo postconf -e 'smtpd_tls_key_file = /etc/ssl/private/server.key'
sudo postconf -e 'smtpd_tls_cert_file = /etc/ssl/certs/server.crt'
sudo postconf -e 'smtpd_tls_loglevel = 1'
sudo postconf -e 'smtpd_tls_received_header = yes'
sudo postconf -e 'myhostname = mail.example.com'

4. If you are using your own Certificate Authority to sign the certificate enter:

sudo postconf -e 'smtpd_tls_CAfile = /etc/ssl/certs/cacert.pem'

Again, for more details about certificates see Section 5, “Certificates”

Note:

After running all the commands, Postfix is configured for SMTP-AUTH and a self-signed
certificate has been created for TLS encryption.

Now, the file /etc/postfix/main.cf should look like this1.


The postfix initial configuration is complete. Run the following command to restart the postfix daemon:


sudo /etc/init.d/postfix restart


Postfix supports SMTP-AUTH as defined in RFC25542. It is based on SASL3. However it is still necessary to set up SASL authentication before you can use SMTP-AUTH.

1.4. Configuring SASL:

Postfix supports two SASL implementations Cyrus SASL and Dovecot SASL. To enable Dovecot 
SASL the dovecot-common package will need to be installed. From a terminal prompt enter the

following:


sudo apt-get install dovecot-common


Next you will need to edit /etc/dovecot/dovecot.conf. In the auth default section uncomment the socket listen option and change the following:

======================*

socket listen {
   #master {
    # Master socket provides access to userdb information. It's typically
    # used to give Dovecot's local delivery agent access to userdb so it
   # can find mailbox locations.
   #path = /var/run/dovecot/auth-master
   #mode = 0600
   # Default user/group is the one who started dovecot-auth (root)


   #user =
   #group =
   #}
   client {
   # The client socket is generally safe to export to everyone. Typical use
   # is to export it to your SMTP server so it can do SMTP AUTH           lookups
   # using it.
   path = /var/spool/postfix/private/auth-client
   mode = 0660
   user = postfix
   group = postfix
   }
}
=====================*

In order to let Outlook clients use SMTP-AUTH, in the auth default section of /etc/dovecot/dovecot.conf add "login":


mechanisms = plain login

Once you have Dovecot configured restart it with:

sudo /etc/init.d/dovecot restart

1.5. Mail-Stack Delivery:

Another option for configuring Postfix for SMTP-AUTH is using the mail-stack-delivery package (previously packaged as dovecot-postfix). This package will install Dovecot and configure Postfix
to use it for both SASL authentication and as a Mail Delivery Agent (MDA). The package also configures Dovecot for IMAP, IMAPS, POP3, and POP3S.

Note:
You may or may not want to run IMAP, IMAPS, POP3, or POP3S on your mail server. For example, if you are configuring your server to be a mail gateway, spam/virus filter, etc. If this is the case it may be easier to use the above commands to configure Postfix for SMTPAUTH.

To install the package, from a terminal prompt enter:

sudo apt-get install mail-stack-delivery


You should now have a working mail server, but there are a few options that you may wish to further customize. For example, the package uses the certificate and key from the ssl-cert package, and in a production environment you should use a certificate and key generated for the host. See Section 5, “Certificates” for more details.


Once you have a customized certificate and key for the host, change the following options in /etc/postfix/main.cf:


smtpd_tls_cert_file = /etc/ssl/certs/ssl-mail.pem
smtpd_tls_key_file = /etc/ssl/private/ssl-mail.key

Then restart Postfix:

sudo /etc/init.d/postfix restart

1.6. Testing:

SMTP-AUTH configuration is complete. Now it is time to test the setup.

To see if SMTP-AUTH and TLS work properly, run the following command:

telnet mail.example.com 25

After you have established the connection to the postfix mail server, type:

ehlo mail.example.com

If you see the following lines among others, then everything is working perfectly. Type quit to exit.


250-STARTTLS
250-AUTH LOGIN PLAIN
250-AUTH=LOGIN PLAIN
250 8BITMIME

1.7. Troubleshooting:
This section introduces some common ways to determine the cause if problems arise.

1.7.1. Escaping chroot:


The Ubuntu postfix package will by default install into a chroot environment for security reasons.

This can add greater complexity when troubleshooting problems.
To turn off the chroot operation locate for the following line in the /etc/postfix/master.cf
configuration file:

smtp               inet                                        -          -          smtpd


and modify it as follows:

smtp               inet                              n          -          -          smtpd

You will then need to restart Postfix to use the new configuration. From a terminal prompt enter:

sudo /etc/init.d/postfix restart

1.7.2. Log Files:

Postfix sends all log messages to /var/log/mail.log. However error and warning messages can sometimes get lost in the normal log output so they are also logged to /var/log/mail.err and /var/log/mail.warn respectively.


To see messages entered into the logs in real time you can use the tail -f command:

tail -f /var/log/mail.err


The amount of detail that is recorded in the logs can be increased. Below are some configuration options for increasing the log level for some of the areas covered above.
• To increase TLS activity logging set the smtpd_tls_loglevel option to a value from 1 to 4.

sudo postconf -e 'smtpd_tls_loglevel = 4'


• If you are having trouble sending or receiving mail from a specific domain you can add the domain to the debug_peer_list parameter.

sudo postconf -e 'debug_peer_list = problem.domain'


• You can increase the verbosity of any Postfix daemon process by editing the /etc/postfix/master.cf and adding a -v after the entry. For example edit the smtp entry:


smtp     unix                               smtp      -     v

Note:

It is important to note that after making one of the logging changes above the Postfix process will need to be reloaded in order to recognize the new configuration: sudo /etc/init.d/postfix reload


• To increase the amount of information logged when troubleshooting SASL issues you can set the following options in 

/etc/dovecot/dovecot.conf


auth_debug=yes
auth_debug_passwords=yes

Note:

Just like Postfix if you change a Dovecot configuration the process will need to be reloaded:
sudo /etc/init.d/dovecot reload.

Note:

Some of the options above can drastically increase the amount of information sent to the log files. Remember to return the log level back to normal after you have corrected the problem.
Then reload the appropriate daemon for the new configuration to take affect.

1.7.3. References:

Administering a Postfix server can be a very complicated task. At some point you may need to turn to the Ubuntu community for more experienced help.


A great place to ask for Postfix assistance, and get involved with the Ubuntu Server community, is the 

#ubuntu-server IRC channel on freenode4. You can also post a message to one of the Web Forums5. For in depth Postfix information Ubuntu developers highly recommend: The Book of Postfix6.

Finally, the Postfix7 website also has great documentation on all the different configuration options available.

Also, the Ubuntu Wiki Postifx8 page has more information.


See you in the next lesson
Mr.Mohamed samir™


Thursday, August 23, 2012

Install Ubuntu in VMware


Quoting one of e-books

How to Install Ubuntu in VMware:

Step 1 – Install VMware:

I am going to use Ubuntu, a Linux distribution that has an outstanding interface and has windows-like
wizards to get the most things done. To install Ubuntu on a Windows machine you have to run a socalled
virtual box in which Ubuntu can run as a kind of machine inside your machine.
To accomplish this, I choose to use VMware player or VMware server, a free software package which
can run virtual machines on your PC.
You can download VMware player/server from their website.

Step 2 – Download the Ubuntu ISO:
Ubuntu comes in different flavors and every 2 year they launch a so called LTS version that means
that this version will be supported for at least 4 years. I downloaded Ubuntu LTS 10.04 (Long Term
Support) from the Ubuntu website. Please be sure your machine supports 64bit when selecting that
flavor.

Step 3 - Install Ubuntu in VMware player:
Next step is to install Ubuntu on the VMware player.
Note: I do not like prefabricated Ubuntu virtual machines because you never know if someone has
been fooling around with it or what is exactly installed on that machine.
On the net there are different videos which show you how to install Ubuntu on VMware.


Remember that most of the OS software is collaborating so in this case VMware player recognizes
that you want to install Ubuntu and starts a wizard.
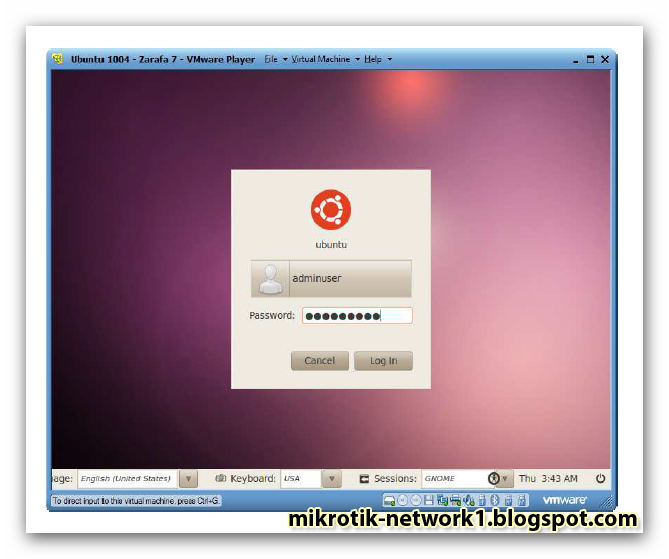
As a user and pass I choose adminuser / adminuser. You can choose whatever name you want, but it
is good to have at least one extra administrator account which you can use to install and administrate
your machine.

Note: 
Do not use usernames like [admin] or [root] since these are reserved words and you will end
up reinstalling Ubuntu.

Note: 
Ubuntu is case sensitive. It is common sense to use lower cases for usernames and mixed
case for passwords. In this case simply choose the same (‘very not safe’) password as the
username.

Name your virtual machine and set the installation path to the location you prefer.
Specify the amount of disk space you want to use for your Virtual Machine. Make sure you allocate
enough space. I selected 20GB of space.
Next


Next to that, customize the hardware for your needs.
At least take 2GB of memory so your Zarafa and MySQL instances will have enough memory to
perform in a proper way.


For better graphic performance, turn the 3D acceleration on.


Finally a decision has to be made what kind of network IP address is given to this virtual machine.
By default NAT is selected. NAT means that VMWare player will create a network subdomain in which
this VM (Virtual Machine) will reside. VMWare player will translate (NAT) all traffic to this VM from
the internet. Although NAT seems like a good idea since it will use the hosts IP address for traffic, it is
better to bridge the VM to get a ‘real’ IP address from the domain controller (or DHCP server) of your
network.


With NAT this machine would get the IP address from VMWare player (192.168.237.130) and while
bridged the VM will receive an IP address from the networks DHCP server (192.168.178.20). The host,
the machines on which VMWare is installed, also got an IP address from the DHCP server
(192.168.178.17).

Watch:
Make sure you end up with at least these changed settings in relation of the default settings:

Processors = 2 cores
Mem = 2 GB
HD = 20 GB
3D Accelerator = On
Network = Bridged

After the installation finishes (this can take up to half an hour) and the login screen pops up, please login with the following credentials:

User : adminuser
Pass : adminuser


See you in the next lesson
Mr.Mohamed samir™

Tuesday, August 21, 2012

The basic steps to install Ubuntu Server Edition

Quoting one of e-books
The basic steps to install Ubuntu Server Edition:

The basic steps to install Ubuntu Server Edition from CD are the same as those for installing any
operating system from CD. Unlike the Desktop Edition, the Server Edition does not include a
graphical installation program. The Server Edition uses a console menu based process instead.


• First, download and burn the appropriate ISO file from the  Ubuntu web site3.
• Boot the system from the CD-ROM drive.
• At the boot prompt you will be asked to select a language.
• From the main boot menu there are some additional options to install Ubuntu Server Edition. You
can install a basic Ubuntu Server, check the CD-ROM for defects, check the system's RAM, boot
from first hard disk, or rescue a broken system. The rest of this section will cover the basic Ubuntu
Server install.
• The installer asks for which language it should use. Afterwards, you are asked to select your
location.
• Next, the installation process begins by asking for your keyboard layout. You can ask the installer
to attempt auto-detecting it, or you can select it manually from a list.
• The installer then discovers your hardware configuration, and configures the network settings using
DHCP. If you do not wish to use DHCP at the next screen choose "Go Back", and you have the
option to "Configure the network manually".
• Next, the installer asks for the system's hostname and Time Zone.
• You can then choose from several options to configure the hard drive layout. Afterwards you
are asked for which disk to install to. You may get confirmation prompts before rewriting the
partition table or setting up LVM depending on disk layout. If you choose LVM, you will be
asked for the size of the root logical volume. For advanced disk options see Section 4, “Advanced
Installation” [p. 10].
• The Ubuntu base system is then installed.
• A new user is set up; this user will have root access through the sudo utility.
• After the user settings have been completed, you will be asked to encrypt your home directory.
• The next step in the installation process is to decide how you want to update the system. There are
three options:
• No automatic updates: this requires an administrator to log into the machine and manually install
updates.
• Install security updates automatically : this will install the unattended-upgrades package, which
will install security updates without the intervention of an administrator. For more details see
Section 5, “Automatic Updates” [p. 27].
• Manage the system with Landscape: Landscape is a paid service provided by Canonical to help
manage your Ubuntu machines. See the Landscape4site for details.

• You now have the option to install, or not install, several package tasks. See Section 2.1, “Package
Tasks” [p. 7] for details. Also, there is an option to launch aptitude to choose specific
packages to install. For more information see Section 4, “Aptitude” [p. 25].
• Finally, the last step before rebooting is to set the clock to UTC.

Note:


If at any point during installation you are not satisfied by the default setting, use the "Go
Back" function at any prompt to be brought to a detailed installation menu that will allow
you to modify the default settings.

At some point during the installation process you may want to read the help screen provided by the
installation system. To do this, press F1.
Once again, for detailed instructions see the  Ubuntu Installation Guide5.


2.1. Package Tasks:

During the Server Edition installation you have the option of installing additional packages from the
CD. The packages are grouped by the type of service they provide.
• DNS server: Selects the BIND DNS server and its documentation.
• LAMP server: Selects a ready-made Linux/Apache/MySQL/PHP server.
• Mail server: This task selects a variety of packages useful for a general purpose mail server system.
• OpenSSH server: Selects packages needed for an OpenSSH server.
• PostgreSQL database: This task selects client and server packages for the PostgreSQL database.
• Print server: This task sets up your system to be a print server.
• Samba File server: This task sets up your system to be a Samba file server, which is especially
suitable in networks with both Windows and Linux systems.
• Tomcat Java server: Installs Apache Tomcat and needed dependencies.
• Virtual Machine host: Includes packages needed to run KVM virtual machines.
• Manually select packages: Executes aptitude allowing you to individually select packages.
Installing the package groups is accomplished using the tasksel utility. One of the important
differences between Ubuntu (or Debian) and other GNU/Linux distribution is that, when installed, a
package is also configured to reasonable defaults, eventually prompting you for additional required
information. Likewise, when installing a task, the packages are not only installed, but also configured
to provided a fully integrated service.
Once the installation process has finished you can view a list of available tasks by entering the
following from a terminal prompt:


tasksel --list-task

Note:

The output will list tasks from other Ubuntu based distributions such as Kubuntu and
Edubuntu. Note that you can also invoke the tasksel command by itself, which will bring up
a menu of the different tasks available.
You can view a list of which packages are installed with each task using the --task-packages option.
For example, to list the packages installed with the DNS Server task enter the following:

tasksel --task-packages dns-server

The output of the command should list:

bind9-doc 
bind9utils 
bind9

If you did not install one of the tasks during the installation process, but for example you decide to
make your new LAMP server a DNS server as well, simply insert the installation CD and from a
terminal:

sudo tasksel install dns-server


See you in the next lesson
Mr.Mohamed samir™


PPP Server Setup Mikrotik


Quoting one of e-books
PPP Server Setup:
Home menu level: /interface ppp-server

Description:

PPP server provides a remode connection service for users. When dialing in, the users can be
authenticated locally using the local user database in the /user menu, or at the RADIUS server
specified in the /ip ppp settings.

Property Description:

port (name; default: (unknown)) - serial port
authentication (multiple choice: mschap2, mschap1, chap, pap; default: mschap2, mschap1,
chap, pap) - authentication protocol
profile (name; default: default) - profile name used for the link
mtu (integer; default: 1500) - Maximum Transmission Unit. Maximum packet size to be
transmitted
mru (integer; default: 1500) - Maximum Receive Unit
null-modem (no | yes; default: no) - enable/disable null-modem mode (when enabled, no modem
initialization strings are sent)
modem-init (text; default: "") - modem initialization string. You may use "s11=40" to improve
dialing speed
ring-count (integer; default: 1) - number of rings to wait before answering phone
name (name; default: ppp-inN) - interface name for reference

Example:

You can add a PPP server using the add command:


See you in the next lesson
Mr.Mohamed samir™