Network Services

Hotspot Mikrotik 777

Technology has been used Bootstrap Compatible Mobile.

Design Hotspot-12 beautiful Server Mikrotik

Design Hot Spot Mikrotik Free

Hotspot login server free

Hotspot login server free.

Merge 2 lines in server Pfsense?

Merge 2 lines in server Pfsense server free.

setup squid cahce in Ubuntu

How to setup squid cahce in Ubuntu ?

Monday, March 11, 2013

How to Getting Started the Dude

How to Getting Started the Dude 

Quoting one e-books


Getting Started
When you first start the Dude client, it launches the local server and automatically connects to 
it. Then you can disconnect and choose another server to connect to. You should remember that 
the client only works when connected to an either local or remote server.
If you do not have any Dude server running yet, you should start it. There is a button on the top
of the application window called “Server”, which has indicator of whether the local server is
running (it is green if the local server is running). If you press it, a new window will appear that
allows you to start/stop the local Dude server, as well as completely reset its configuration.
When a server is started, you can connect to it pressing the Connect button. There are three 
connection modes:
local – to connect to the local Dude server (note that this option will not work for Linux
users running the Dude under Wine, you should use remote connection to 127.0.0.1 host
instead to connect to the local Dude server)
remote – to connect insecurely (nothing, including passwords, is encrypted) to a remote
Dude server
secure – to connect securely to a remote Dude server
Remote connection by default is using TCP 2210 port in regular mode or TCP 2211 port in
secure mode, so make sure these ports are not limited by a firewall. The ports may be changed
in the server's Global Settings menu. The default username for connecting to a server is
“admin” with no password. You can change this later.
Note for Linux users: you should start the Dude from the root user (or delegate some 
permissions to your regular user), or else the Dude will not be able to ping hosts.

Tuesday, March 5, 2013

The Dude Device discovery

The Dude/Device discovery

Quoting one of the websites


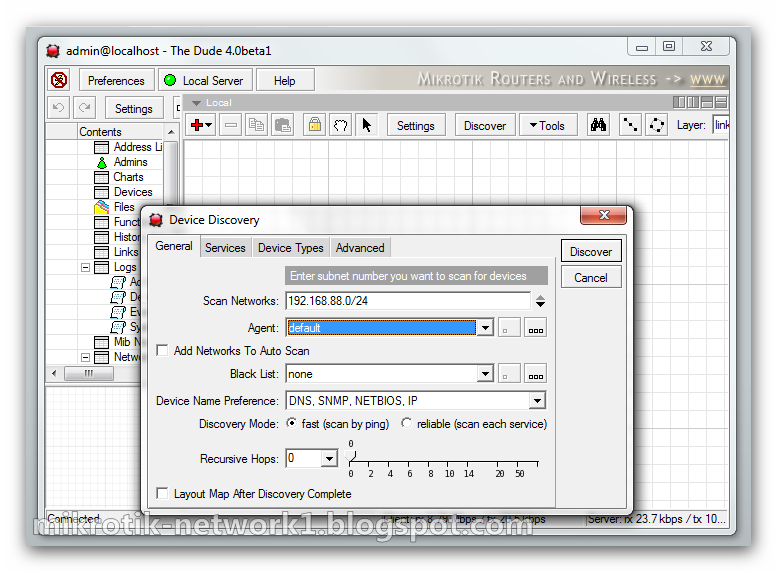
The Dude can automaticall scan ranges of IP addresses to discover active devices on your networks. To do this, you have to use the Discovery interface. Upon first use of the Dude, the discovery window is opened automatically, however, you can also open the discovery interface later, by clicking the Discovery button in the main button panel.


General


  • Scan networks - enter the IP networks that you wish The Dude to scan. Click the black "down" arrow to add more networks
  • Agent - select another Dude agent for the scan task. The Default agent is selected upon first use, and it's the local server. Click on the ... icon to browse for other agents or to add new agents.
  • Add networks to auto scan - when checked, this option will keep updating the map when new devices appear even after the initial scan is finished. The default scan interval is one hour, you can change this in the main Dude Settings menu.
  • Black list - You can select which devices should not be scanned. This is useful if you have printers that react strangely to port scans, or devices that don't like to be pinged. Click the ... button to create lists of devices to be used in the Blacklist.
  • Device name preference - decides how to name your devices by default. Can choose between DNS, SNMP, NETBIOS and IP or combinations of those. If the field is set to DNS to SNMP to IP, then DNS name will be used when available, if it is not, then SNMP-derived name will be used, but if neither of them are detected, then IP address will be used as the device name.
  • Discovery mode - can choose between Fast scan by ping and Reliable scan that scans each service. When choosing the fast scan, all devices that can respond to ping will be added to the Map, and then their services will be proofed. However, if you choose Reliable scan, the Dude will look for the specified services even in the devices that couldn't be pinged. This is helpful if you have devices which can't be pinged, or which have the ping blocked.
  • Recursive hops - whether to scan recursively all the networks found connected to the initially discovered devices. I.e., in case there were some network devices detected which are connected to more than one network, whether to continue scanning also the network these devices are connected to. This parameter is set to the maximal hop (network device) number, which to scan the connected networks from. Important! It is not recommended to set more than 1 hop at your initial discovery, and never to set more than 5, as this will most likely scan thousands of devices in all of your local networks, and will take a long time.
  • Layout after discovery is complete will not only put the devices on the map in sequential rows, but will also attempt to draw a logical map layout. Especially useful if discovering by more than 1 hop.

Services

This tab defines which services need to be scanned at the time of discovery. To improve discovery time, you should uncheck the services you are not interested in. This also decides which services to probe at IP addresses that did not respond to ping.

the ... button allows you to add new probes that will look for other services.


Device Types

The dude can also automatically assign icons to your devices, based on the device type. Device types can be configured by clicking the ...button. Each device can have required identification patterns, based on services The Dude discovered running on it. For example the predefined requirement for a "Mail server" device type is a running SMTP service. You can change the required services for existing devices, or add new devices with new requirements.


Advanced

In the Advanced tab of the Discovery window you can deselect certain tasks that you don't want to be done.

Identify device types - follow the rules set in the Device Types menu

Add networks - include icons for networks

  • Add links - link devices together with lines
  • Layer 2 structure -
  • PPP links
  • Graph service poll times
  • Graph link Bit rate
  • Add Serviceless (deselected by default)


Discovery Process

After you have selected all the options, click on Discover and the process will be started. This will be indicated by aScanning information in the bottom edge of the Dude main window


It is possible to monitor the scan progress in the map settingswindow. Click the Settings button in the main Dude window and in the General view you will see the currently running scan, and the time of the next scan, if auto-scan was requested.


It is possible to monitor the scan progress in the map settingswindow. Click the Settings button in the main Dude window and in the General view you will see the currently running scan, and the time of the next scan, if auto-scan was requested.


Sunday, March 3, 2013

What is the Dude

What is the Dude ?
Quoting one of the e-books


The Dude is a visual and easy to use network monitoring and management system designed to
represent network structure in one or more crosslinked graphical diagrams, allowing you to
draw (includes automatic network discovery tool) and monitor your network whatever
complicated it can be. The Dude is capable of monitoring particular services run on the network
hosts, and alerting you about any changes in their status. It can read statistics from the device
monitored and show you graphs of the monitored values, allows you to test and connect to the
devices easily, and provides some very basic RouterOS configuration tools.
It is written in two parts:


Dude server is the actual program, which runs in background. It does not have any
graphical interface, and may only be controlled by a Dude client application located either
on local machine, or anywhere on the network. There is also a web interface to basic
functionality, mostly designed as a quick and accessible review tool, not a full-fledged
configuration application.
Dude client may connect to the local or a remote Dude server, and is used as a graphical
interface to it. That means that every action is really executed on the server machine and
the client is just showing pictures. Thus, user window layouts are stored on the server and
are not lost on disconnect.