Network Services

Hotspot Mikrotik 777

Technology has been used Bootstrap Compatible Mobile.

Design Hotspot-12 beautiful Server Mikrotik

Design Hot Spot Mikrotik Free

Hotspot login server free

Hotspot login server free.

Merge 2 lines in server Pfsense?

Merge 2 lines in server Pfsense server free.

setup squid cahce in Ubuntu

How to setup squid cahce in Ubuntu ?

Sunday, April 20, 2014

The –a Switch


The –a Switch
The –a switch displays a remote machine’s NetBIOS name table, which is a list of all the Net- BIOS names that that particular machine “knows about.” The following command produced
the output for the server S1 shown in Figure 4.5:

nbtstat –a S1

FIGURE 4 . 5 Sample output of the nbtstat –a command


TABLE 4 . 1 Last Byte Identifiers for Unique Names
TABLE 4 . 2 Last Byte Identifiers for Group Names


As you can see, using this switch produces an output with four columns. The Name column gives the NetBIOS name entry of the host in the NetBIOS name table of the remote machine.
The next column displays a unique two-digit hexadecimal identifier for the NetBIOS name. This identifier represents the last byte of the NetBIOS name shown in the Name column and is necessary
because the same name might be used several times on the same station. It uniquely identifies which service on the host the name is referencing. Tables 4.1 and 4.2 list the hexadecimal
identifiers for unique and group host names. 
      The Type column refers to the type of NetBIOS name being referenced:

  • Unique NetBIOS names refer to individual hosts.
  • Group names refer to the names of logical groupings of workstations, either domains or workgroups.

The Status column refers to the status of the NetBIOS name for the specified host, regardless of whether the name has been registered with the rest of the network.

Saturday, April 19, 2014

Using the nbtstat Utility


Using the nbtstat Utility
You’ll remember from the last chapter that NetBIOS associates names with workstations. But NetBIOS is only an upper-layer interface and requires a transport protocol. In many cases, TCP/

IP is used. You use the nbtstat utility to do the following:


  • Track NetBIOS over TCP/IP statistics
  • Show the details of incoming and outgoing NetBIOS over TCP/IP connections
  • Resolve NetBIOS names

Because NetBIOS name resolution is primarily a Windows network issue, the nbtstat command is available only in Windows-based operating systems.
To display a basic description of nbtstat and its associated options, type nbtstat at the command line. You’ll use these options to configure the display of information about NetBIOS over TCP/IP hosts. Here are some of the switches you can use:

–a                 –A
–c                   –n
–r                   –R
–S                   –s

TIP
All nbtstat switches are case sensitive. Generally speaking, lowercase switches deal with NetBIOS names of hosts, and uppercase switches deal with the TCP/IP addresses of hosts.

The –p Switch


The –p Switch
Like the –n switch, the –p switch is a modifier. Typically used with the –s switch (discussed earlier),
it specifies which protocol statistics to list in the output (IP, TCP, UDP, or ICMP). For example, if you want to view only ICMP statistics, you use the –p switch like so:
netstat –s –p ICMP

The netstat utility then displays the ICMP statistics instead of the gamut of TCP/IP statistics that the –s switch normally produces.

Real World Scenario ......
Uses for netstat

You might be saying to yourself, “OK. Fine…I can use lots of cool switches with netstat, but what is it good for, really?” I’m always finding uses for netstat. One time, I found a particularly nasty worm on my PC using netstat. Being the geek that I am, I just happened to run netstat for giggles one day and noticed a very large number of outbound connections to various places on the Internet. It was sending out SYN packets to a large number of hosts (an indication that my computer was involved—unknowingly—in a large-scale denial of service attack). Upon furtherexamination, I noticed that this activity would start shortly after bootup.

I tried running netstat after bootup and noticed that the first outbound connection was to TCP port 6667 to some IRC server I’d never heard of (I didn’t even have an IRC client on my machine at the time). It was particularly nasty to try to get rid of while active, so I turned off port 6667 on my firewall. That prevented the initial connection to the IRC server (and, as I found out later,prevented the worm from getting its instructions from the IRC server) and I was then able to remove it. I would have never found out that this worm was working without netstat. My antivirus program even missed it.

The –n Switch


The –n Switch
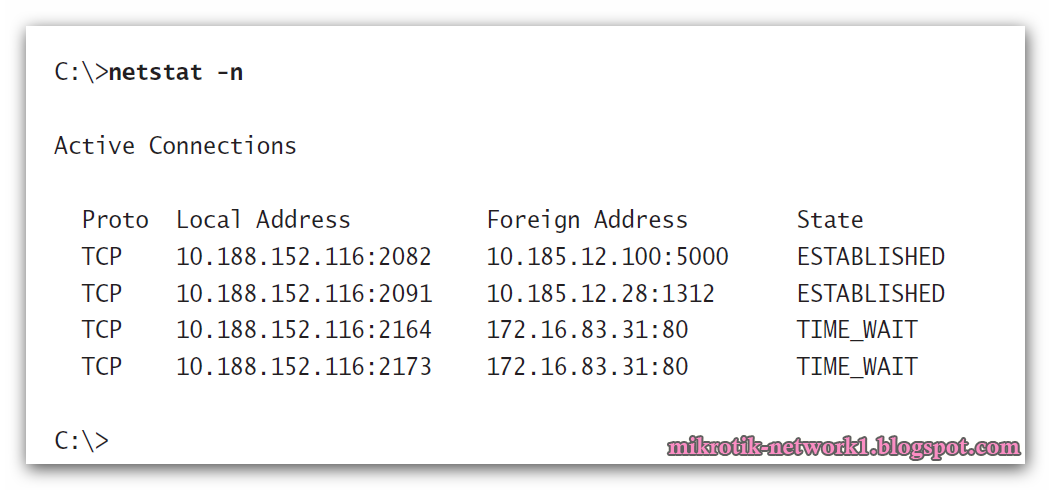
The -n switch is a modifier for the other switches. When used with other switches, it reverses the natural tendency of netstat to use names instead of network addresses. In other words,
when you use the –n switch, the output always displays network addresses instead of their associated network names. Following is output from the netstat command and then the netstat -n command, showing the same information but with IP addresses instead of names:


Friday, April 18, 2014

The –s Switch


The –s Switch
Using the –s switch displays a variety of TCP, UDP, IP, and ICMP protocol statistics. The following is some sample output using this switch.

C:\netstat –s

IP Statistics

Packets Received                   = 17455
Received Header Errors             = 0
Received Address Errors            = 108
Datagrams Forwarded                = 0
Unknown Protocols Received         = 0
Received Packets Discarded         = 0
Received Packets Delivered         = 17346
Output Requests                    = 16374
Routing Discards                   = 255
Discarded Output Packets           = 0
Output Packet No Route             = 0
Reassembly Required                = 2

Reassembly Successful              = 1
Reassembly Failures                = 0
Datagrams Successfully Fragmented  = 0
Datagrams Failing Fragmentation    = 0

Fragments Created                  = 0

ICMP Statistics

                                               Received                      Sent
Messages                                       12                           19
Errors                                            0                                0
Destination Unreachable               0                               7
Time Exceeded                              0                               0
Parameter Problems                      0                                0
Source Quenchs                            0                                0
Redirects                                       0                                0
Echos                                             4                               8
Echo Replies                                 8                                4
Timestamps                                   0                                0
Timestamp Replies                       0                                 0
Address Masks                             0                                 0

Address Mask Replies                  0                                 0


TCP Statistics
Active Opens                                   = 715
Passive Opens                                  = 0
Failed Connection Attempts            = 35
Reset Connections                           = 638
Current Connections                        = 1
Segments Received                          = 15815
Segments Sent                                  = 15806
Segments Retransmitted                   = 61


UDP Statistics
Datagrams Received                        = 573
No Ports                                           = 946
Receive Errors                                 = 0

Datagrams Sent                                = 492

NOTE:
Because the Network+ exam doesn’t cover them, we won’t go into detail on what all these statistics mean. You can probably figure out some of them, such as Packets Received. For details, go to Microsoft’s support website atwww.microsoft.com/support/.


The –r Switch


The –r Switch
 You use the –r switch to display the current route table for a workstation so that you can see how TCP/IP information is being routed. Figure 4.4 shows sample output using this switch. You
can tell from this output which interface is being used to route to a particular network (useful if computers have multiple NICs).

FIGURE 4 . 4 Sample output of the netstat –r command


The –e Switch


The –e Switch 
The -e switch displays a summary of all the packets that have been sent over the network interface card (NIC) as of that instant. The two columns in Figure 4.3 show packets coming in as well
as being sent.

FIGURE 4 . 3 Sample output of the netstat –e command


You can use the –e switch to display the following categories of statistics: 
Bytes   The number of bytes transmitted or received since the computer was turned on. This statistic is useful in helping to determine if data is actually being transmitted and received or if the

network interface isn’t doing anything.

Unicast Packets The number of packets sent from or received at this computer. To register in one of these columns, the packet must be addressed directly from one computer to another and the computer’s address must be in either the source or destination address section of the packet.

Non-unicast Packets The number of packets not directly sent from one workstation to
another. For example, a broadcast packet is a non-unicast packet. The number of non-unicast
packets should be smaller than the number of unicast packets. If the number of nonunicast packets is as high as or higher than that of unicast packets, too many broadcast packets are being sent on your network. You should find the source of these packets and make any necessary adjustments.

Discards The number of packets that were discarded by the NIC during either transmission or reception because they weren’t assembled correctly.

Errors The number of errors that occur during transmission or reception. These numbers may indicate problems with the network card. 

Unknown Protocols The number of received packets that the Windows networking stack couldn’t interpret. This statistic shows up only in the Received column because, if the computer
sent them, they wouldn’t be unknown, would they?

    Unfortunately, statistics don’t mean much unless they can be colored with time information. For example, if the Errors column shows 100 errors, is that a problem? It might be if the computer
has been on for only a few minutes. But 100 errors could be par for the course if the computer has been operating for several days. Unfortunately, the netstat utility doesn’t have a way of indicating

how much time has elapsed for these statistics.


Thursday, April 17, 2014

Using the netstat Utility


Using the netstat Utility

Using netstat is a great way to see the TCP/IP connections (both inbound and outbound) on your machine. You can also use it to view packet statistics (similar to the MONITOR.NLM utility
on a NetWare server console), such as how many packets have been sent and received, the number of errors, and so on.
When used without any options, netstat produces output similar to that in Figure 4.1, which shows all the outbound TCP/IP connections (in the case of Figure 4.1, a Web connection).
The netstat utility, used without any options, is particularly useful in determining the status of outbound Web connections.
The Proto column lists the protocol being used. Because this is a Web connection, the protocol is TCP. The Local Address column lists the source address and the source port (source socket). In this case, default indicates that the PC has no NetBIOS name configured and refers to the local IP address, which is followed by the source ports, four separate dynamically registered
TCP ports used to open four separate TCP connections. The Foreign Address item for all four connections is 204.153.163.2:80, indicating that for all four connections, the address of the destination machine is 204.153.163.2 and that the destination port is TCP port 80 (in other words, HTTP for the Web). The State column indicates the status of each connection. This column
shows statistics only for TCP connections because UDP establishes no virtual circuit to the remote device. Usually, this column indicates ESTABLISHED once a TCP connection between
your computer and the destination computer is established.


FIGURE 4 . 1 Output of the netstat command without any switches


NOTE:
If the address of either your computer or the destination computer can be found in the HOSTS file on your computer, the destination computer’s name, rather than the IP address, will show up in either the Local Address or Foreign Address column.

The output of the netstat utility depends on the switch. You can use the following :

  •  –a
  • –e
  • –r
  • –s
  • –n
  • –p

Simply type netstat followed by a space and then the switch. Some switches have options, but the syntax is basically the same. Note the UNIX style of the switches, where the hyphen must be included. This is common in Microsoft operating systems for TCP/IP utilities, which stem from original use in UNIX systems.

The –a Switch

The –a Switch
When you use the –a switch, the netstat utility displays all TCP/IP connections and all User Datagram Protocol (UDP) connections. Figure 4.2 shows a sample output produced by the netstat –a command.
The last two entries in Figure 4.2 show a protocol type of UDP and the source port nicknames of nbname and nbdatagram, which are the well-known port numbers of 137 and 138, respectively. These port numbers are commonly seen on networks that broadcast the NetBIOS name of a workstation on the TCP/IP network. You can tell that this is a broadcast because the destination address is listed as *:* (meaning “any address, any port”).  

FIGURE 4 . 2 Sample output of the netstat –a command

NOTE:
The State column has no entry because UDP is not a connection-oriented protocol and, therefore, has no connection state.

The most common use for the –a switch is to check the status of a TCP/IP connection that appears to be hung. You can determine if the connection is simply busy or is actually hung and no longer responding.


Wednesday, April 16, 2014

Using The arp Utility


Using The arp Utility

ARP is a protocol in the TCP/IP suite. ARP is used by IP to ascertain the MAC address of a device on the same subnet as the requester. When a TCP/IP device needs to forward a packet
to a device on the local subnet, it first looks in its own table, called an ARP cache ( cache because the contents are periodically aged out), for an association between the known IP address of the destination device on the local subnet and the same device’s MAC address. If no association that includes the destination IP address can be located, the device sends out an 
ARP broadcast that includes its own MAC and IP information as well as the IP address of the target device and a blank MAC address field, which is the object of the whole operation. It
is this one unknown value that the source device requests be returned in an ARP reply. Windows includes a utility called
arp , which allows viewing of the operating system’s ARP cache.
To start the arp utility in Windows 2000, follow these steps:


  1. Choose Start  Run and enter cmd to open the MS-DOS Prompt window. Or, you can choose Start Programs  Accessories  Command Prompt.
  2. At the command prompt, type arp and any switches you need, as discussed later in this section.

NOTE:
Entered alone, the 
arp 
command lists only the switches you must use in order 
to use the 
arp 
utility correctly.

The arp utility is primarily useful for resolving duplicate IP addresses. For example, your workstation receives its IP address from a Dynamic Host Configuration Protocol (DHCP)
server, but it accidentally receives the same address as another workstation. When you try to ping it, you get no response. Your workstation is trying to determine the MAC address, and it
can’t do so because two machines are reporting that they have the same IP address. To solve this problem, you can use the
arp utility to view your local ARP table and see which TCP/IP address is resolved to which MAC address. To display the entire current ARP table, use the arp command with the –a switch, like this:

arp -a


You’ll see something similar to the following:
Interface: 204.153.163.3 on Interface 2

Internet Address            Physical Address             Type
204.153.163.2                00–a0–c9–d4–bc–dc       dynamic
204.153.163.4                00–a0–c0–aa–b1–45       dynamic
 
TIP:
The –g switch will produce the same result.

From this output, you can tell which MAC address is assigned to which IP address. Then, for static assignments, by examining your network documentation (you do have it, don’t you?), you
can tell which workstation has the IP address and if it is indeed supposed to have it. For DHCPassigned addresses, you can begin to uncover problems with multiple DHCP scopes or servers giving out identical addresses and other somewhat common configuration issues. Note that, under normal circumstances, you should not see IP addresses in the ARP table for a given interface that are not members of the same IP subnet as the interface, and each other for that matter.

NOTE:
If the machine has more than one network card (as may happen in Windows servers), each interface will be listed separately.
In addition to displaying the ARP table, you can use the arp
utility to manipulate the table. To add static entries to the ARP table, use the arp command with the –s switch. These entries
stay in the ARP table until the machine is rebooted. A static entry hard-wires a specific IP address to a specific MAC address so that when a packet needs to be sent to that IP address, it  is sent automatically to that MAC address. Here’s the syntax:

arp –s [IP Address] [MAC Address]
Simply replace the [IP Address] and [MAC Address] sections with the appropriate entries, like so:

arp –s   204.153.163.5    00–a0–c0–ab–c3–11


You can now take a look at your new ARP table by using the arp –a command. You should see something like this:

Interface: 204.153.163.3 on Interface 2

Internet Address             Physical Address                Type
204.153.163.2                   00–a0–c9–d4–bc–dc           dynamic
204.153.163.4                   00–a0–c0–aa–b1–45           dynamic
204.153.163.5                  
00–a0–c0–ab–c3–11            static


Finally, if you want to delete entries from the ARP table, you can either wait until the 
dynamic entries time out, or you can use the –d switch with the IP address of the static entry 
you’d like to delete, like so:

arp –d 204.153.163.5

This deletes the entry from the ARP table in memory.


NOTE:
The arp utility doesn’t confirm successful additions or deletions (use arp -a or 
arp -g for that), but it will give you an error message if you use incorrect syntax.


The Windows ARP Table


The Windows ARP Table

The ARP table in Windows is a list of TCP/IP addresses and their associated physical (MAC) addresses. This table is cached in memory so that Windows doesn’t have to perform ARP lookups for frequently accessed TCP/IP addresses (for example, servers and default gateways). Each entry contains not only an IP address and a MAC address, but a value for Time to Live (TTL), which indicates how long each entry stays in the ARP table.

         The ARP table contains two kinds of entries:


  • Dynamic
  • Static

Dynamic ARP table entries

are created whenever the Windows TCP/IP stack performs an
ARP lookup and the MAC address is not found in the ARP table. The ARP request is broadcast on the local segment. When the MAC address of the requested IP address is found, that information
is added to the ARP table as a dynamic entry.


Note: 
The ARP table is cleared of dynamic entries whose TTL has expired to ensure that the entries are current.The ARP table is cleared of dynamic entries whose TTL has expired to ensure that the entries are current.


Tuesday, April 15, 2014

Using the Address Resolution Protocol (ARP)

Using the Address Resolution Protocol (ARP)

The Address Resolution Protocol, or ARP, is part of the Transmission Control Protocol/Internet Protocol (TCP/IP) protocol stack; it is used to translate TCP/IP addresses to MAC (media access control) addresses using broadcasts. When a machine running TCP/IP wants to know which machine on an Ethernet network uses a particular IP address, it will send an ARP broadcast that says, in effect, “Hey! Who is IP address xxx.xxx.xxx.xxx ?” The machine that owns the specific address will respond with its own MAC address. The machine that made the inquiry then adds

that information to its own ARP table.

        In addition to the normal usage, the ARP designation refers to a utility in Windows that you can use to manipulate and view the local workstation’s ARP table.