Network Services

Hotspot Mikrotik 777

Technology has been used Bootstrap Compatible Mobile.

Design Hotspot-12 beautiful Server Mikrotik

Design Hot Spot Mikrotik Free

Hotspot login server free

Hotspot login server free.

Merge 2 lines in server Pfsense?

Merge 2 lines in server Pfsense server free.

setup squid cahce in Ubuntu

How to setup squid cahce in Ubuntu ?

Friday, June 8, 2012

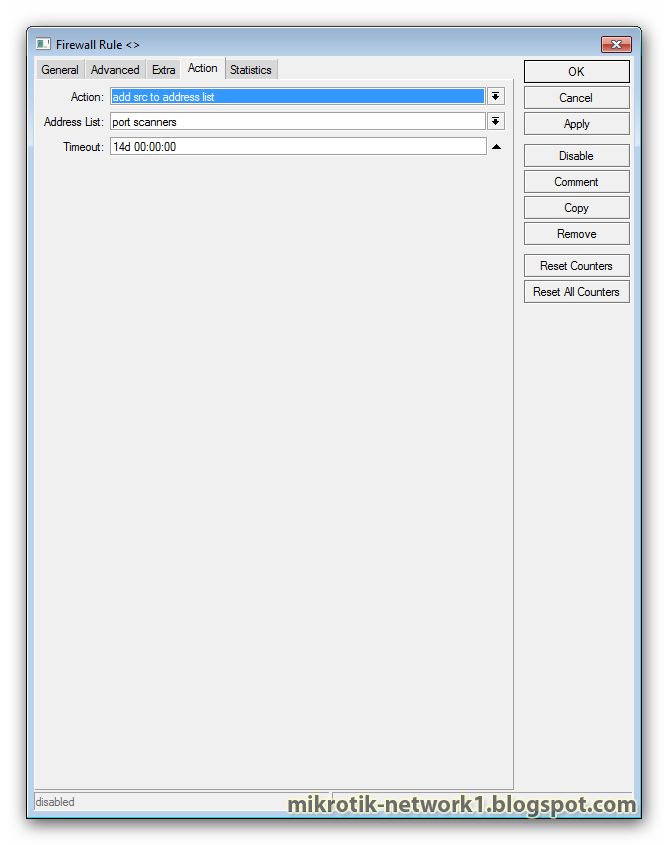
Drop port scanners for mikrotik


Drop Port Scanner from Hackers
add Code


/ip firewall filter
add chain=input protocol=tcp psd=21,3s,3,1 action=add-src-to-address-list addresslist="port scanners" address-list-timeout=2w comment="Port scanners to list" disabled=no

add chain=input protocol=tcp tcp-flags=fin,!syn,!rst,!psh,!ack,!urg action=add-src-to-address-list address-list="port scanners" address-list-timeout=2w comment="NMAP FIN Stealth scan"
add chain=input protocol=tcp tcp-flags=fin,syn action=add-src-to-address-list address-list="port scanners" address-list-timeout=2w comment="SYN/FIN scan"
add chain=input protocol=tcp tcp-flags=syn,rst action=add-src-to-address-list address-list="port scanners" address-list-timeout=2w comment="SYN/RST scan"
add chain=input protocol=tcp tcp-flags=fin,psh,urg,!syn,!rst,!ack action=add-src-to-address-list address-list="port scanners" address-list-timeout=2w comment="FIN/PSH/URG scan"
add chain=input protocol=tcp tcp-flags=fin,syn,rst,psh,ack,urg action=add-src-to-address-list address-list="port scanners" address-list-timeout=2w comment="ALL/ALL scan"
add chain=input protocol=tcp tcp-flags=!fin,!syn,!rst,!psh,!ack,!urg action=add-src-to-address-list address-list="port scanners" address-list-timeout=2w comment="NMAP NULL scan"
add chain=input src-address-list="port scanners" action=drop comment="dropping port scanners" disabled=no


Added Example code


with you

 Mohamed Samir

Thursday, June 7, 2012

Bandwidth management in Mikrotik Hotspot Area


Bandwidth management in Mikrotik Hotspot Area

Many users are always menannyakan about how to prioritize traffic traffic use RouterOS Hotspot service.
The following methods help to regulate network traffic and adjust it your way want.


 It also ensures the right to provide services for a specific use in a large network, giving priority to VIPs, the User or special services in a network which is too much.

Also, you can use the same method if you want to make sure the user that they should not download or upload a file as an long period to save the rest of the traffic available to the Light users who are looking for a good speed for browsing. 


It can be applied to memakasi burst limit or a combination of limit-at and burst limit with priorities. The trick with using the Users Profiles bandwidth management, and commissioned the kind of speed speed different from that associated with a particular group.
 Now for setting up trafficnya, we can use the following formula:


x1k/y1k x2k/y2k x3k/y3k x5/y5 P x6k/y6k 
placed in the user profile Rate Limit where: 
x1k/y1k: Rate (txrate / rxrate i.e 128k/1024k)
 x2k/y2k: Burst Rate (i.e 256k/2048k)
 x3k/y3k: Burst Threshold (i.e 160k/1280k)
 x5/y5: Burst Time (in seconds i.e: 60/60)
 Priority: P (use integer from 1-8)
 Minimum rate: x6k/y6k (i.e 32k/256k)


Well this is the screenshot:
 meaning of the above settings:
 Rate: 24k/128k 
Burst Rate: 32k/256k 
Burst Threshold: 24k/196k 
Burst Time: 30/30 
Priority: 8 Minimum 
rate: 16k/64k


Well later in the simple queue will look the same as setting the hotspotnya:

Now to check the priority of this view:
 Good luck ........
 with you 

Mohamed Samir

How to limit traffic download RapidShare in Mikrotik


How To: Limit Traffik Download Rapidshare


The following quick article will explain how to restrict traffic download from rapidshare.
The thing to note is, how to use this script to detect meutilisasi DNS
So the use of DNS Cache ... How To Mikrotik for this is a liability ...
A. script
Basically the script when run will check the DNS Cache, and find that there are entry
the word 'rapidshare' ... make a log entry kamudian ... then put the obtained IP Address List on the list to
'rapidshare'


:foreach i in=[/ip dns cache find] do={
:if ([:find [/ip dns cache get $i name] "rapidshare"] > 0) do={
:log info ("rapidshare: " . [/ip dns cache get $i name] . " (ip address " . [/ip dns
cache get $i address] . ")")
/ip firewall address-list add address=[/ip dns cache get $i address] list=rapidshare
disabled=no
}}


2. Run the Script The above script should be run periodically by the scheduler to get the best results ... can is set to go once a minute or 5 minutes once an hour or so ... all up to you and the conditions there ... create a new entry in the scheduler:

Start Date and Time are set according to the time you want

3. mangle At this time there should have been Barun address list


Then create a new mangle rule to mark-conn


then, create a mangle rule to mark-packet new


4. queue
 Finally, we can narrow down the traffic ... example of the application can use a simple queue see below ...

For the experiments just trying to do the download from rapidshare, then enable and disable the rule queue it and feel the difference ...

 with you 

Mohamed Samir


Manual:IP/DHCP Server Mikrotik


Applies to RouterOS: v3, v4


Summary:

The DHCP (Dynamic Host Configuration Protocol) is needed for easy distribution of IP addresses in a network. The
MikroTik RouterOS implementation includes both server and client parts and is compliant with RFC 2131.
The router supports an individual server for each Ethernet-like interface. The MikroTik RouterOS DHCP server
supports the basic functions of giving each requesting client an IP address/netmask lease, default gateway, domain
name, DNS-server(s) and WINS-server(s) (for Windows clients) information (set up in the DHCP networks
submenu)


In order DHCP server to work, you must set up also IP pools (do not include the DHCP server's own IP address into
the pool range) and DHCP networks.
It is also possible to hand out leases for DHCP clients using the RADIUS server, here are listed the parameters for
used in RADIUS server.
Access-Request:
• NAS-Identifier - router identity
• NAS-IP-Address - IP address of the router itself
• NAS-Port - unique session ID
• NAS-Port-Type - Ethernet
• Calling-Station-Id - client identifier (active-client-id)
• Framed-IP-Address - IP address of the client (active-address)
• Called-Station-Id - name of DHCP server
• User-Name - MAC address of the client (active-mac-address)
• Password - ""
Access-Accept:
• Framed-IP-Address - IP address that will be assigned to client
• Framed-Pool - ip pool from which to assign ip address to client
• Rate-Limit - Datarate limitation for DHCP clients. Format is: rx-rate[/tx-rate] [rx-burst-rate[/tx-burst-rate]
[rx-burst-threshold[/tx-burst-threshold] [rx-burst-time[/tx-burst-time][priority] [rx-rate-min[/tx-rate-min]]]]. All
rates should be numbers with optional 'k' (1,000s) or 'M' (1,000,000s). If tx-rate is not specified, rx-rate is as
tx-rate too. Same goes for tx-burst-rate and tx-burst-threshold and tx-burst-time. If both rx-burst-threshold and
tx-burst-threshold are not specified (but burst-rate is specified), rx-rate and tx-rate are used as burst thresholds. If
both rx-burst-time and tx-burst-time are not specified, 1s is used as default. Priority takes values 1..8, where 1
implies the highest priority, but 8 - the lowest. If rx-rate-min and tx-rate-min are not specified rx-rate and tx-rate
values are used. The rx-rate-min and tx-rate-min values can not exceed rx-rate and tx-rate values.
• Ascend-Data-Rate - tx/rx data rate limitation if multiple attributes are provided, first limits tx data rate, second -
rx data rate. If used together with Ascend-Xmit-Rate, specifies rx rate. 0 if unlimited
• Ascend-Xmit-Rate - tx data rate limitation. It may be used to specify tx limit only instead of sending two
sequential Ascend-Data-Rate attributes (in that case Ascend-Data-Rate will specify the receive rate). 0 if
unlimited


• Session-Timeout - max lease time (lease-time)


General
Sub-menu: /ip dhcp-server
add-arp (yes | no; Default: no)

Whether to add dynamic ARP entry. If set to no either ARP mode should be enabled on that interface or
static ARP entries should be administratively defined in /ip arp submenu.


address-pool (string | static-only; Default: static-only)

IP pool, from which to take IP addresses for clients. If set to static-only, then only the clients that have a
static lease (i.e. no dynamic addresses will be given to clients, only the ones added in lease submenu) will be
allowed


always-broadcast (yes | no; Default: no)
Always send replies as broadcasts.


authoritative (after-10sec-delay | after-2sec-delay | no | yes; Default:after-2sec-delay)

Whether the DHCP server is the only one DHCP server for the network:
• after-10sec-delay - to clients request for an address, dhcp server will wait 10 seconds and if there is
another request from the client after this period of time, then dhcp server will offer the address to the
client or will send DHCPNAK, if the requested address is not available from this server
• after-2sec-delay - to clients request for an address, dhcp server will wait 2 seconds and if there is another
request from the client after this period of time, then dhcp server will offer the address to the client or will
send DHCPNAK, if the requested address is not available from this server
• yes - to clients request for an address that is not available from this server, dhcp server will send negative
acknowledgment (DHCPNAK)
• no - dhcp server ignores clients requests for addresses that are not available from this server.

boot-support (none | static |dynamic; Default: static)


Support for BOOTP clients
• none - do not respond to BOOTP requests
• static - offer only static leases to BOOTP clients
• dynamic - offer static and dynamic leases for BOOTP clients.


delay-threshold (time; Default:none)

If secs field in DHCP packet is smaller than delay-threshold, then this packet is ignored. If set to none - there
is no threshold (all DHCP packets are processed).

interface (string; Default: )
Interface on which server will be running

lease-time (time; Default: 72h)
 the time that a client may use the assigned address. The client will try to renew this address after a half of this
time and will request a new address after time limit expires.


name (string; Default: )
 Reference name.


relay (IP; Default: 0.0.0.0) 
the IP address of the relay this DHCP server should process requests from:
• 0.0.0.0 - the DHCP server will be used only for direct requests from clients (no DHCP really allowed)
• 255.255.255.255 - the DHCP server should be used for any incomming request from a DHCP relay
except for those, which are processed by another DHCP server that exists in the /ip dhcp-server submenu.


address (IP; Default: 0.0.0.0)
 The address which the DHCP client must send requests to in order to renew an IP address lease. If there is
only one static address on the DHCP server interface and the source-address is left as 0.0.0.0, then the static
address will be used. If there are multiple addresses on the interface, an address in the same subnet as the
range of given addresses should be used.


use-radius (yes | no; Default: no) 
Whether to use RADIUS server for dynamic leases


Menu specific commands.


setup () Release current binding and restart DHCP client


Server configuration
Sub-menu: /ip dhcp-server config
Leases are always stored on disk on graceful shutdown and reboot. If they would be saved on disk on every lease
change, a lot of disk writes would happen. There are no problems if it happens on a hard drive, but is very bad for
Compact Flash (especially, if lease times are very short). To minimize writes on disk, all changes are saved on disk
every store-leases-disk seconds. If this time will be very short (immediately), then no changes will be lost even in
case of hard reboots and power losts. But, on CF there may be too many writes in case of short lease times (as in
case of hotspot). If this time will be very long (never), then there will be no writes on disk, but information about
active leases may be lost in case of power loss. In these cases dhcp server may give out the same ip address to
another client, if first one will not respond to ping requests.


store-leases-disk (time | immediately | never; Default: 5min) How frequently lease changes should be stored on disk


Sub-menu: /ip dhcp-server network


address (IP/netmask;Default: )
the network DHCP server(s) will lend addresses from


boot-file-name (string;Default: )
Boot file name


dhcp-option (string;Default: )
Add additional DHCP options from option list.


dns-server (string;Default: )
the DHCP client will use these as the default DNS servers. Two comma-separated DNS servers can be specified to be
used by DHCP client as primary and secondary DNS servers


domain (string; Default: ) 
The DHCP client will use this as the 'DNS domain' setting for the network adapter.


gateway (IP; Default:0.0.0.0)
The default gateway to be used by DHCP Client.


netmask (integer: 0..32;Default: 0)
The actual network mask to be used by DHCP client. If set to '0' - netmask from network address will be used.


next-server (IP; Default: ) 
IP address of next server to use in bootstrap.


ntp-server (IP; Default: ) 
the DHCP client will use these as the default NTP servers. Two comma-separated NTP servers can be specified to be
used by DHCP client as primary and secondary NTP servers


wins-server (IP; Default: ) 
The Windows DHCP client will use these as the default WINS servers. Two comma-separated WINS servers can be
specified to be used by DHCP client as primary and secondary WINS servers


Leases
Sub-menu: /ip dhcp-server lease
DHCP server lease submenu is used to monitor and manage server's leases. The issued leases are showed here as
dynamic entries. You can also add static leases to issue a particular client (identified by MAC address) the desired IP
address.
Generally, the DHCP lease it allocated as follows:
• an unused lease is in waiting state
• if a client asks for an IP address, the server chooses one
• if the client will receive statically assigned address, the lease becomes offered, and then bound with the respective
lease time
• if the client will receive a dynamic address (taken from an IP address pool), the router sends a ping packet and
waits for answer for 0.5 seconds. During this time, the lease is marked testing
• in case, the address does not respond, the lease becomes offered, and then bound with the respective lease time
• in other case, the lease becomes busy for the lease time (there is a command to retest all busy addresses), and the
client's request remains unanswered (the client will try again shortly)
A client may free the leased address. The dynamic lease is removed, and the allocated address is returned to the
address pool. But the static lease becomes busy until the client will reacquire the address.

Note: that the IP addresses assigned statically are not probed.


address (IP; Default: ) 
Specify ip address (or ip pool) for static lease. If set to 0.0.0.0 - pool from server will be used.


always-broadcast (yes | no; Default: ) 
Send all repies as broadcasts.


block-access (yes | no; Default: no)
 Block access for this client.


client-id (string; Default: )
 If specified, must match DHCP 'client identifier' option of the request.


lease-time (time; Default: 0s) 
Time that the client may use the address. If set to 0s lease will never expire.


mac-address (MAC; Default: 00:00:00:00:00:00) 
If specified, must match the MAC address of the client.


src-mac-address (MAC; Default: )
 Source MAC address.


use-src-mac (MAC; Default: )
 Use this source MAC address instead.


active-address (IP) 
Actual IP address for this lease


active-client-id (string)
 Actual client-id of the client


active-mac-address(MAC)
Actual MAC address of the client


active-server (list)
 Actual dhcp server, which serves this client


agent-circuit-id (string)
 Circuit ID of DHCP relay agent


agent-remote-id (string)
 Remote ID, set by DHCP relay agent


blocked ( flag ) 
Whether the lease is blocked


expires-after (time) 
Time until lease expires
host-name (text) 
Shows host name option from last received DHCP request


radius (yes | no)
 Shows, whether this dynamic lease is authenticated by RADIUS or not


rate-limit (string)
 Sets rate limit for active lease. Format is: rx-rate[/tx-rate] [rx-burst-rate[/tx-burst-rate]
[rx-burst-threshold[/tx-burst-threshold] [rx-burst-time[/tx-burst-time]]]]. All rates should be numbers with optional 'k'
(1,000s) or 'M' (1,000,000s). If tx-rate is not specified, rx-rate is as tx-rate too. Same goes for tx-burst-rate and
tx-burst-threshold and tx-burst-time. If both rx-burst-threshold and tx-burst-threshold are not specified (but burst-rate is
specified), rx-rate and tx-rate is used as burst thresholds. If both rx-burst-time and tx-burst-time are not specified, 1s is
used as default


server (string) 
Server name which serves this client


status (waiting | testing |authorizing | busy |offered | bound)
Lease status:
• waiting - not used static lease
• testing - testing whether this address is used or not (only for dynamic leases) by pinging it with timeout of 0.5s
• authorizing - waiting for response from radius server
• busy - this address is assigned statically to a client or already exists in the network, so it can not be leased
• offered - server has offered this lease to a client, but did not receive confirmation from the client
• bound - server has received client's confirmation that it accepts offered address, it is using it now and will free the
address not later, than the lease time will be over


check-status(id)
Check status of a given busy dynamic lease, and free it in case of no response

make-static (id) Convert a dynamic lease to a static one


Alerts
Sub-menu: /ip dhcp-server alert
To find any rogue DHCP servers as soon as they appear in your network, DHCP Alert tool can be used. It will
monitor ethernet for all DHCP replies and check, whether this reply comes from a valid DHCP server. If reply from
unknown DHCP server is detected, alert gets triggered:


When the system alerts about a rogue DHCP server, it can execute a custom script.
As DHCP replies can be unicast, rogue dhcp detector may not receive any offer to other dhcp clients at all. To deal
with this, rogue dhcp detector acts as a dhcp client as well - it sends out dhcp discover requests once a minute


alert-timeout (none | time;Default: none)
Time, after which alert will be forgotten. If after that time the same server will be detected, new alert will be
generated. If set to none timeout will never expire.

interface (string; Default: )
 Interface, on which to run rogue DHCP server finder.

on-alert (string; Default: ) 
Script to run, when an unknown DHCP server is detected.

valid-server (string; Default: ) 
List of MAC addresses of valid DHCP servers.

Read only properties
unknown-server (string)
 List of MAC addresses of detected unknown DHCP servers. Server is removed from this list after alert-timeout

Menu specific commands:


reset-alert(id)
Clear all alerts on an interface


DHCP Options:
Sub-menu: /ip dhcp-server option
With help of DHCP Option list, it is possible to define additional custom options for DHCP Server to advertise.
According to the DHCP protocol, a parameter is returned to the DHCP client only if it requests this parameter,
specifying the respective code in DHCP request Parameter-List (code 55) attribute. If the code is not included in
Parameter-List attribute, DHCP server will not send it to the DHCP client.


code (integer:1..254; Default: )
 dhcp option code. All codes are available at [1]


name (string; Default: )
Descriptive name of the option


value (string; Default: )
 Parameter's value in form of a string. If the string begins with "0x", it is assumed as a hexadecimal value


Example


Classless route adds specified route in clients routing table. In our example it will add dst-address=160.0.0.0/24
gateway=10.1.101.1


Result:


Basic examples
To configure DHCP server on ether1 interface to lend addresses from 10.0.0.2 to 10.0.0.254 which belong to the
10.0.0.0/24 network with 10.0.0.1 gateway and 159.148.60.2 DNS server for the time of 3 days:


The wizard has made the following configuration based on the answers above:


[Back to Content]


with you 
Mohamed Samir


Wednesday, June 6, 2012

شرح كيفية التحكم باالمستخدمين من حيث الصلاحيات المعطاة لهم من خلال السيرفر

شرح كيفية التحكم باالمستخدمين من حيث الصلاحيات المعطاة لهم من خلال السيرفر 

مقدمة حول صلاحيات win2k3 : تكمن الصلاحيات فى  win2k3 على تهيئة القرص الصلب بنظام الملفات NTFS الذى يمكنك بإعطاء االحماية والصلاحيات لكل من حسابات المستخدمين User Account او المجموعة Groups او على الكمبيوترات Computers على مصادر الشبكة 
مبداء عمل الصلاحيات : 
يخزن نظام NTFS قائمة تحكم للوصول ( access control list )  الى كل مجلد وملف مخون فى القرص االصلب الذى هيئ بنظام ملفات NTFS الـACL تحتوى على قائمة بجميع حسابات المستخدمين والمجموعات والكمبيوترات التى تمنحك الوصول الى المجلدات او الملفات ونوعية هذا الوصول ايضا 
للتوضيح اكثر :
عند طلب مستخدم للوصول الى مجلد او ملف معين فإن الـ ACL يجب ان تحتوى على متدخلات حسابات االمستخدمين والمجموعات او الكمبيوترات وتسمى هذه المدخلات بـ ( Access Control Entry ) المدخلات يجب ان تحدد نوعية الوصول للمستخدم الذى طلب فتح مجلد او ملف وهل له الصلاحية بفتحه او منعه  يعنى اذا لم ننشاء ACE داخل ACL فان ويندوز 2003 سوف يمنع المستخدم من الوصول الى المصدر سواء كان مجلد او ملف انظر الصورة 
======
اذونات الـ NTFS :
فى وحدات التخزين NTFS على Win2k3يمكنك ضبط الصلاحيات على المجلد والملفات والطابعات و على وحدات التخزين وهذه المسميات يطلق عليها اسم الكائنات Objects وسنتطرق بشرح كامل عن كل ما سبق 

اذونات المجلدات والملفات : 
يمكنك تطبيق اذونات على المجلدات والملفات بتنفيذ الخطوط التالية 
1- من مستكشف ويندوز انقر بزر الفارة اليمن على المجلد او الملف الذى تريد العمل معه 
2- من القائمة المختصرة اختر Properties ثم من مربع الحوار اختار علامة التبويب Security 
3- من اللائحة Name اختر المستخدم او المجموعة او الكمبيوتر الذى تريد تطبيق الاذونات عليه  إذا كانت الاذونات خافته فهذا يعنى انها مورثة من كائن اب (( سنتكل عن هذه الخاصية لا حقا )) 
4- ستلاحظ فى ويندوز 2003 سيرفر انه لا وجود للعضو Everyone الذى يمنح تحكم كامل بالملفات والمجلدات فلزيادة الامان حذف هذا العضو وتركزت الادارة على Administrators 

فهم إذونات الملفات والمجلدات : 
الاذونات الاساسية التى يمكنك تعينها للمجلدات والملفات ملخصة بالجدول التالى 


ملاحظة مهمة : 
كلما عملت مع صلاحيات المجلدات والملفات يجب ان تتذكر ما يلى : 
1- Read هو الاذن الوحيد المطلوب لتشغيل النصوص الاذن Execute غير مهم 
2- إعطاء الاذن بالكتابة فى ملف ولكن بعدم حذفه لا يمنع المستخدم من حذف محتويات الملف 
3- إذا اخذ مستخدم تحكم كامل على مجلد سيتمكن من حذف الملفات الموجودة داخل هذا المجلد بغض النظر عن الاذن المعطى له على الملفات 

الاذونات الخاصة بالمجلدات :
سنشرح الاذونات الخاصة المستعملة فى المجلدات ونسبها الى الاذونات الاساسية 

ملاحظة مهمة : 
1- عندما تضبط الاذونات للمجلدات الاباء (( شنتطرق بشرح هذه المجلدات لا حقا )) يمكنك إجبار كل الملفات والمجلدات الفرعية ضمن المجلد على وراثة الاذونات وذالك بوضع إشارة أمام 
Reset Permissions on child objects and enable Propagation Of inheritable Permissions 
2- عندما تنشا ملفات فى المجلدات سترث تلك الملفات بعض إعدادات اذونات واعدادات هذه الاذونات تظهر  كا الاذونات الافتراضية للملفات 
الاذونات الخاصة بالملفات :
الاذونات الخاصة المستعملة لانشاء الاذونات الاساسية للملفات باستعمالك إعدادات الاذونات المتقدمة يمكنك تعيين تلك الاذونات فرديا إذا لزم الامر وفى اجدول التالى نوضح التناسق بين الاذونات الاساسية والخاصة 

ملاحظة مهمة : 
1- إذا لم يتم منح Allow او منع Deny إذن ما بالتحديد سيمنع ذلك الاذن عن المستخدم 
2- الاعمال التى يستطيع المستخدمين تنفيذها ترتكز على مجموعة كل الاذونات المعنية للمستخدمين وكل المجموعات التى يكون المستخدم عضوا بها 
مثلا : 
إذا كان المستخدم User1 يملك الاذن Read وكان عضو بالمجموعة Group B والتى تملك الاذن Write سيملك User1 الاذن Write & Read واذا كانت المجموعة Dragon بدورها عضو بمجموعة Administrators التى تملك الاذن Full Control سيملك 
SAM تحكما كاملا على الملف 

معلومات يجب ان تتذكرها وتاخذ بعين الاعتبار :
اذا كان ابمستخدم User1 يملك الاذن Deny Write وكان عضو بالمجموعة Group B التى تمتلك الاذن Change سيملك User1 الاذن بالمنع من الوصول الى المجلدات والملفات ( انظر الصورة التالية )

ضبط اذونات الملفات والمجلدات : 
لضبط اذونات الملفات والمجلدات نفذ الخطوات التالية :
1- بزر الفارة الايمن على المجلد او الملف الذى تريد تطبيق الاذونات عليه واختر Properties
2- من مربع حوار الخصائص اختر التبويب Security  
3- المستخدمين او المجموعات الذين يملكون وصولا الى الملفات او المجلد من قبل سيكونو مذكورين فى الائحة Name يمكنك تغيير اذونات اولئك المستخدمين والمجموعات بتنفيذ ما يلى 
*اختر المستخدم او المجموعة الذى تريد تغيير صلاحياته 
*استعمل الائحة Permissions لمنع او منح اذونات الوصول 

ملاحظة : الاذونات المورثه مظللة أذا كنت تريد تخطى أذن مورث فاختر الاذن المعاكس 

4- ضبط صلاحيات الوصول لمستخدم او مجموعات او كمبيوترات إضافية انقر على الزر Add سيعرض مربع الحوار 
فى اللاحة Enter the Object  ادخل اسم المستخدم او المجموعة او الكمبيوتر الذى تريد ان تطبق عليه الاذونات 
إذا تم العثور على تطابق واحد يتم تحديث مربع الحوار وسيتم تسطير الادخال 
إذا لم يتم العثور على تطابق تكون إما كتبت جزاء من الاسم غير صحيح انك تعمل مع مكان غير صحيح عدل الاسم وحاول مرة اخرى او انقر على Location لانتقاء مكان جديد 

ملاحظة : الزر Location يتيح لك الوصول الى اسماء حسابات من Domain اخر ولكن لا تستطيع الوصول الى موارد هذا الدومين إلا اذا كانت هناك ثقه بين الدومينين 

إذا تم العثور على عدة تطابقات انتق الاسماء الذين تريد استعماله ثم OK
لاضافة مستخدمين او مجموعة او كمبيوترات إضافية  اكتب فاصلة منقوطة ( ; )  ثم كرر هذه الخطوة .

وإذا لم تكن تتذكر اسم هذا الكائن ( اقصد بالكائن هم المستخدمين او المجموعة او الكمبيوترات ) فضغط على Advanced فسيعرض لك مربع حوار 


لاختيار نوع الكائن الذى تريد تطبيق الصلاحيات عليه اضغط على Object Type 
إذا كان هناك عدة اماكن Domain لاختيار كائن اضغط على Location لانتقاء مكان جديد New Domain 
اضغط على Find now لبحث لك عن كل الكائنات الموجودة على الDomain ثم ما عليك الا ان تختار الكائن وتضيفه الى الائحة name 
5- من الائحة name اختر المستخدم او المجموعة او الكمبيوتر الذى تريد ضبط الاذونات عليه ثم استعمل الحقول فى الPermission 
لمنع او منح الاذونات ثم كرر العملية مع كائنات اخرى 
6- انقر OK عندما تنتهى 

قوانين نسخ Copy نقل (قص ) Move الملفات والمجلدات : 
عندما تنسخ او تنقل الملفات او المجلدات الاذونات يمكن ان تتغير طريقة نقل الكائنات الشي الذى على مدير الشبكة ان يفهمه هو ما الذى سوف يتغير فى اذونات الملفات او المجلدات بعد نقلها او نسخها 

a- عندما تنسخ ملف  او مجلد من خلال قسم NTFS واحد فان الملف او المجلد سوف يرث اذونات المجلد الذى انتقل اليه 

b- عندما تنسخ ملف او مجلد بين اقسام NTFS فان الملف او المجلد سوف يإخذ صلاحيات المجلد الذى انتقل اليه 

c- عندما تنسخ ملف او مجلد الى قسم نظام ملفاته غير NTFS ( مثل FAT او FAT32 ) فان الملف او المجلد سوف يخسر جميع الصلاحيات التى كانت عليه 

## قص Move المجلد والملفات:
عندما تنقل (  تقص )  ملف او مجلد من مجلد الى اخر او من قسم الى قسم اخر فان اذونات هذه الملفات او المجلدات يمكن اان تتغير سنشرح اثر هذا التنقل على الملفات والمجلدات 
a- عندما تنقل ملف اومجلد من خلال قسم NTFS واحد فان الملف او المجلد سوف يرث الصلاحيات الاصلية ولا بتغير بها شئ 

b- عندما تنقل ملف او مجلد بين اقسام NTFS فان الملف او المجلد سو ياخذ صلاحيات المجلد الذى انتقل اليه فعليا انت قمت بنسخ الملف او المجلد الى مكان جديد وحذفت المجلد او الملف من المكان القديم 

c- عندما تنقل ملف او مجلد الى قسم نظام ملفات غير NTFS ( مثل FAT او FAT 32 ) فان الملف او المجلد سوف يخسر جميع الصلاحيات التى كانت عليه 

ضبط اذون الطابعة :
الطابعات الشبكية هى احد الموارد المشتركة وبالتالى يمكنك ضبط اذونات الوصول لها 
1- استعمال خصائص الطابعة التى تريد ان تضبط تكوينها لضبط اذونات الوصول 
2- افتح مربع الحوار ثم اختار علامة التبويب Security

3- اختر المستخدم الذى تريد تطبيق الاذونات عليه واذا لم يكن موجود فى اللائحة اضغط على Add واضف كائن جديد ( لزيادة معلومات راجع ضبط اذونات الملفات والمجلدات )
4- ثم Ok

فهم اذونات الوصول الى الطابعة : 

الاذونات الاساسية التى يمكن منحها او منعها للطباعة هى Print  ( طباعة ) و Manage Documents  ( إدارة المستندات ) Mange Printers  (إدارة الطابعات ) سوف اشرح قدرات كل من هذه الصلاحيات 

الاذونات الخاصة للطابعات ....

سوف نبين الاعدادات الافتراضية لمربع الحوار Print Permissions التى تستعمل لاي طابعة شبكية جديدة تنشئها 
يمكنك Administrator و server Operators و Printer operators تحكما كاملا على الطابعات بشكل افتراضى هذا يتيح لك إدارة الطابعة واعمال طباعتها 
منشئ (Creator ) او ملك ( Owner ) المستند يملك إدارة مستنده هذا يتيح للشخص التى طبع بإدارة مستنداته كتغييرها او حذفها 
يستطيع Everyone الطباعة على الطابعة هذا يمكن كل المستخدمين على الشبكة من الوصول الى الطابعة 

اذونات الوصول لـ Removable Storage 
كا لكائنات الاخرى فى ويندوز سيرفر 2003 تملك Removable Storage اذونات وصول محددة يمكنك ضبط اذونات الوصول لكل من Removable Storage   وكذلك media الوسائط libraries المكتبات والوسائط الفردية يلخص الجدول التالى اذونات المستخدمين المتوفرة من الادنى الى الاعلى 

ملاحظة مهمة : 
الاذونات التى تنطب على نظام Removable Storage لا تنطبق على الملفات التى تكون مخزنة فى الوسائط اى لا تزال الوصول NTFS تنطبق على الملفات دون  تاثير بصلاحيات Removable Storage 

ضبط اذونات Removable Storage ....
فى البداء تكون Removable Storage مضبوطة لكى يديرها نظام التشغيل واعضاء Adminstrators و Bakup Operators يمنح المستخدمون العاديون وصولا محدودا فقط وهذا يكون ضرورية لنسخ الملفات احتياطيا واستعادتها فى الكمبيوترات لذا حتى لو منحت شخاص ما تحكما قد لا يستطيع نسخ الملفات احتياطيا او استعادتها 
ولضبط هذه الصلاحيات قم بتنفيذ الخطوات التالية : 
1- بزر الفارة الايمن على My computer  واختر  Manage 
2- من مربع حوار Computer Management انقر باليمين على العنصر الذى تريد العمل معه واختر Properties . 

من مربع حوار Properties اختر التبويب Security 

4- المستخدمين او المجموعة التى يمكنها الوصول الى العنصر مذكورة فى الائحة Gorup or User  name غير الاذونات باستخدام 
Permissions for  ... لمنح او منع اذونات الوصول الضافة مستخدم او مجموعة فى الائحة اضغط على Add واضف كائن جديد 
5- عندما تنتهى اضغط OK .


كان معكم 
محمد سمير 
نقلا عن احد الكتب الالكترونية